
|
Back to Help Library
Search by custom boundary25/6/2024 If you have an area you are particularly interested in, say for example
To search by custom boundary: Click the search icon. Apply any parameters you want to search by. Note - some parameters cannot be searched in combination with the custom boundary tool, for example unique values such as references or project titles. Select 'Search by custom boundary' toggle.   This will enable drawing functionality which appears in the top left of the map. Select the polygon icon and click on the map. Clicking points on the map will allow you to trace a shape on the map. Double click to complete your shape. From here you can search, or save your search and turn it into a watchlist. 
Back to Help Library
How to turn on/off notifications7/6/2024 Feature available mid June You can choose to receive a weekly email notification on any of your watchlists. The notification is sent weekly on a Friday morning and is a roundup of any activity on watchlists you've chosen to be notified on. You can turn the notifications off at any time. First off - you'll need to either bookmark some projects, or create some saved searches and turn them in to watchlists. Once that's done, if you head to your dashboard you'll see a grey envelope icon next to each watchlist. Click the grey envelope to turn on the notification. You'll see it changes colour and there is a tick in the envelope. This indicates that you have notifications turned on for this watchlist. To turn off the watchlist, click the envelope again so it turns grey. 
Back to Help Library
How to set up a watchlist7/6/2024 Feature available mid June Watchlists are great tools to be kept updated on project activity. For example, if you're an event manager, you might want to create a search which alerts you to any projects happening in or near the vicinity of your planned event. To do this, within the search menu, you'd draw a boundary around the event location, and save the search, and turn it into a watchlist, then turn notifications on for that watchlist. This means that any time a project is added within the boundary you've created, you'll receive a weekly notification - how good! Here's how to set up a watchlist:
 Your watchlist will now be available to view in the dashboard as per screenshot below. To access the watchlist, click on the title in the menu, and the watchlist will open up in the screen.  How to turn on notifications Click the envelope icon next to the watchlist to turn on notifications. You will then receive a weekly round-up email for changes in watchlists you have turned on the notification for. We will only send you one email each week. An aqua envelope indicates notifications are turned on for that particular watchlist. To turn off the notification for the watchlist, just click the envelope to make it grey again.
Back to Help Library
How to save a search7/6/2024 Screenshots will be added shortly to this help guide.
Saved searches are currently available, dynamic watchlists will be available in mid June. If you want to set up a dynamic watchlist, or if you carry out regular project searches in the Forward Works Viewer and want to save time, then setting up a saved search is the tool for you. Setting up a saved search To do this, head to the Search menu. Fill in the search fields for what you want to search for, and select 'save search'. You will be asked to give the search a name. At this point you can also turn the search into a watchlist. If you just want to save the search, click 'confirm'. Your saved search will now be accessible at the top of the search menu, in the 'Apply saved search' drop down. If you want to set up a dynamic watchlist, check out this guide. Overwriting/amending a saved search If you have applied a saved search and want to change your search parameters, you have two options. First of all, select your saved search from the 'apply saved search' drop down menu at the top of search menu. Change your search parameters. From here, you can either overwrite the saved search (and watchlist if the search is associated with a watchlist), or create a new saved search. If you select 'save this search', a modal will pop up asking you to either overwrite, or create a new search. If you overwrite, then the saved search will update with the new parameters, and update a watchlist if it's associated with the search. If you select 'create new', then you'll be given the option of naming the new saved search and turning it into a watchlist. Deleting a saved search To delete a saved search, click the trash can icon next to the saved search name in the 'apply saved search' dropdown. Note - deleting a saved search which is linked to a watchlist, will also delete the watchlist.
Back to Help Library
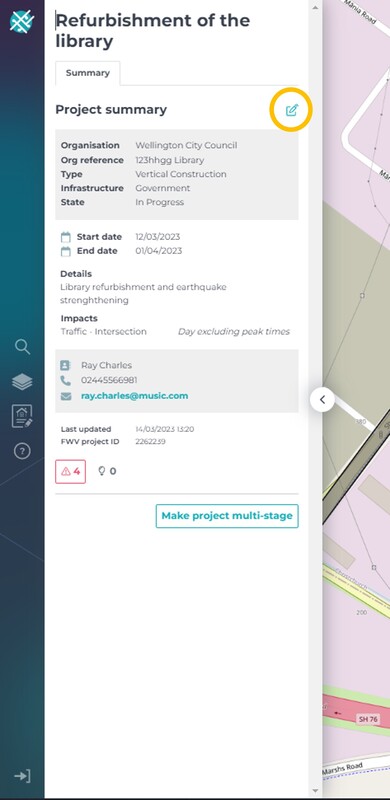
How to bookmark a project1/3/2024 Feature available in mid June There are two different types of watchlist within your dashboard:
There are two ways you can bookmark a project: 1) Bookmarking an individual project From the project summary page, click on the Bookmark button in the top right hand corner of the project summary page. Once clicked, the button will highlight and the project will be added to your bookmarked projects list found in your dashboard.  2) Bookmarking multiple projects at once from Search Results From the search results page, click the 'bookmark all' button. Note - in the future you will be able to add individual projects from the search results, but currently it's a bulk add - use this at your peril if you have many search results, as your bookmark projects list will quickly become unwieldly and there is no way for you to bulk remove projects from your bookmarked project watchlist. If you do have too many projects in there, you can email [email protected] and we can bulk remove for you. Removing projects from your bookmark list To remove the project from your bookmarks, you can either click the bookmark button again from the project summary page, or click the trash can icon next to the project in your watchlist.  
Back to Help Library
Signing up/Logging in1/3/2024 Signing Up
If your organisation has SSO enabled for the Forward Works Viewer, it's easy to log in - you don't need to sign up. Type your email address into the Log In field. If you have been given access by your organisation, you will be authenticated and you will be able to log in without setting up an account. If you have not been given access by your organisation, an error message will pop up. You'll need to contact your organisation's IT department to request access to the system. If your organisation is not using SSO and you don't yet have an account:
Back to Help Library
Accessing stacked projects6/10/2023 In busy areas, there will often be multiple projects stacked on top of each other. To access a project which may be hidden underneath another, click on the project. This will open up a menu on the left hand side which will list all of the projects within the area that you clicked.  You can hover over the project title in the list, and the matching project on the map will highlight. If you click on the project title, this will take you to the project summary page. 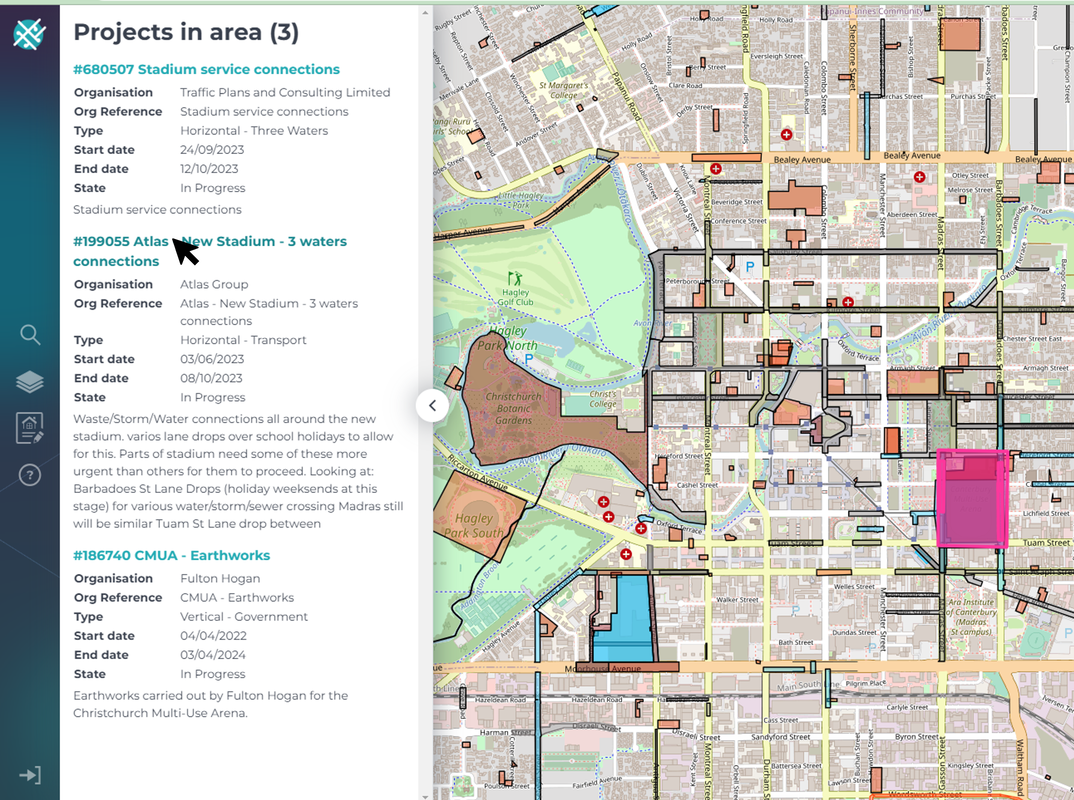
Back to Help Library
Clash/Opportunity detection26/9/2023 The Forward Works Viewer has built in clash/opportunity detection. A clash is a project which is occurring in the same shape boundary, during the same time, as your project. An opportunity is a project which is occurring in the same shape boundary, at a different time to your project. The shapes have to overlap on the map for them to be a clash or an opportunity. To see if your project has a clash or an opportunity, click on your project (either from the map, 'My Organisation's Projects, or search results). On the project summary page you'll see icons at the bottom. If they're greyed out then there are no clashes or opportunities. If they're coloured and have a number next to them, that indicates there is a clash/opportunity, and how many projects there are a clash or opportunity. 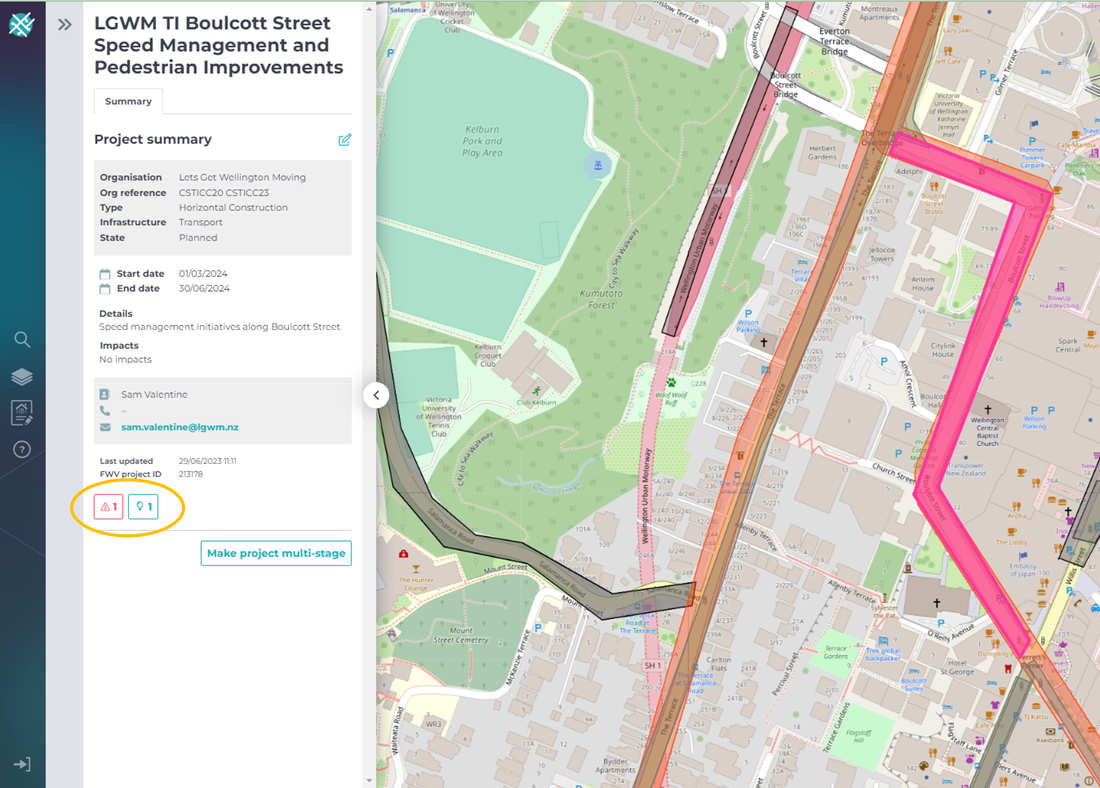 You can click on the clash/opportunity button if it is coloured. This will bring up a list of projects which are a clash or opportunity. (Note - if the project is a multi-stage project, the number of clashes and opportunities is displayed on the project summary page, but to find out the list of projects clashing you'll need to navigate to the stage page and click on the icon from there) 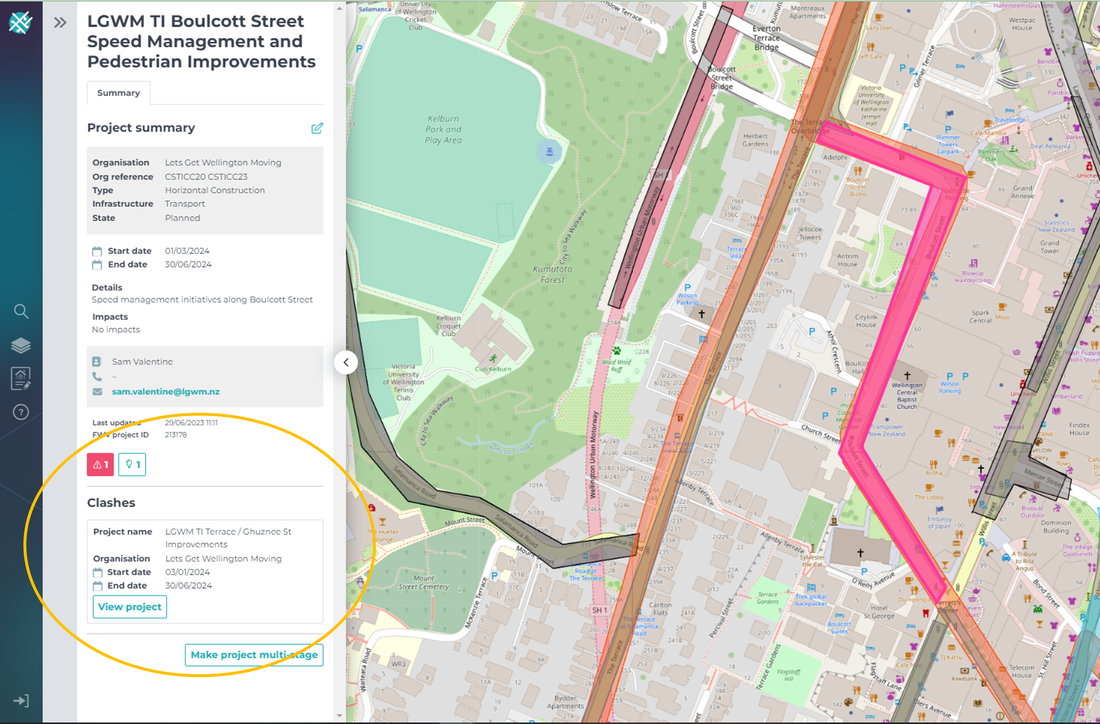 If you click the 'view project' button in the clash/opportunity list, this will bring up the project details of that clash/opportunity, as below. 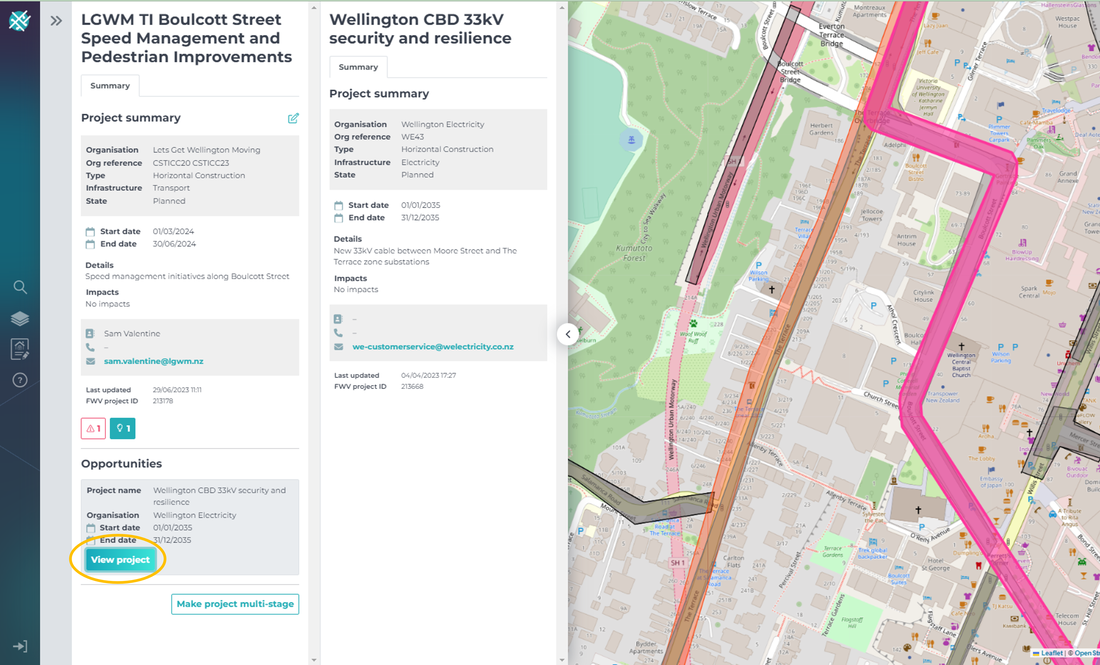
Back to Help Library
RAMM to NFWV1/5/2023 RAMM layers can be published to the NFWV. If you have data held in RAMM, follow the below steps to create a URL of the data you want to share. 1) Set up a RAMM layer that you want to share. What you see on the RAMM map will be what is published to the NFWV. The example below uses a dispatch layer with all of the resurfacing job types. NOTE: make sure you are saving the dispatch layer as a unique saved layer, otherwise you'll only be able to export it as an excel file. You also need to be able to see dispatches on the map you're exporting. 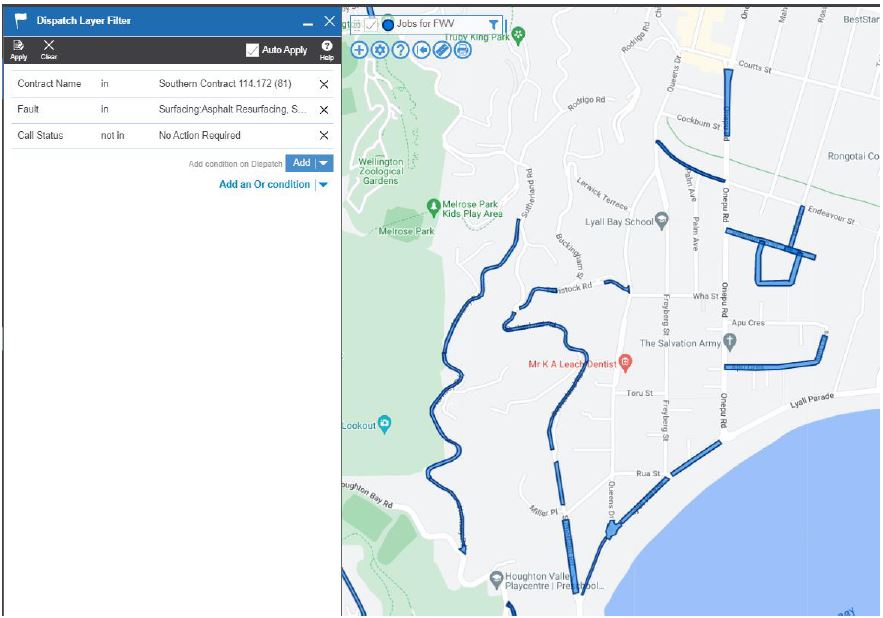 2) Open up the layer menu by clicking on the layer and navigate to the columns option. Select the columns that you wish to publish to the NFWV. Don't share anything you don't want to be seen in the NFWV. Make sure to select 'Apply'. 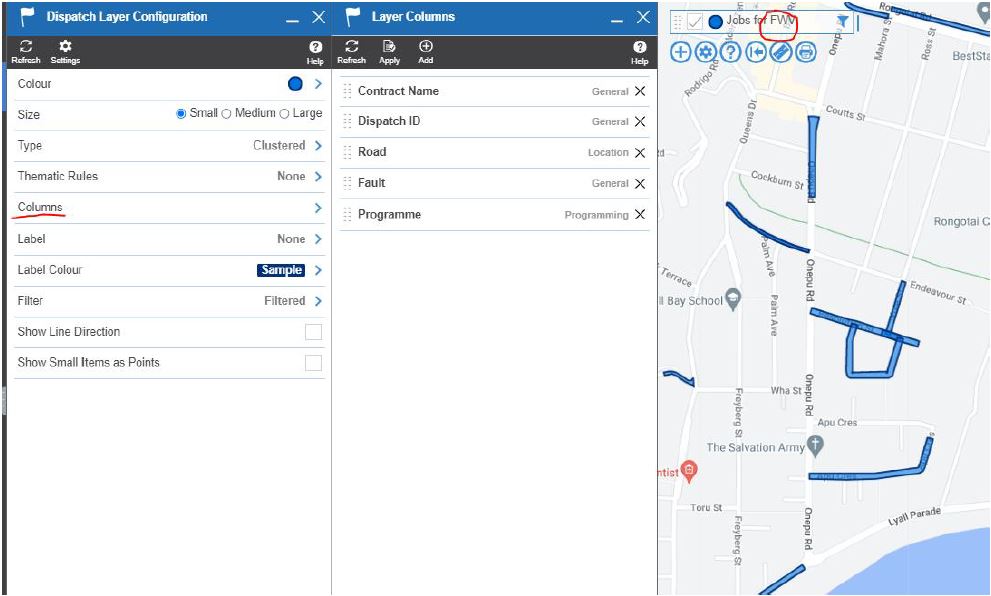 3) Navigate to the Settings, name the layer something suitable and save the layer. 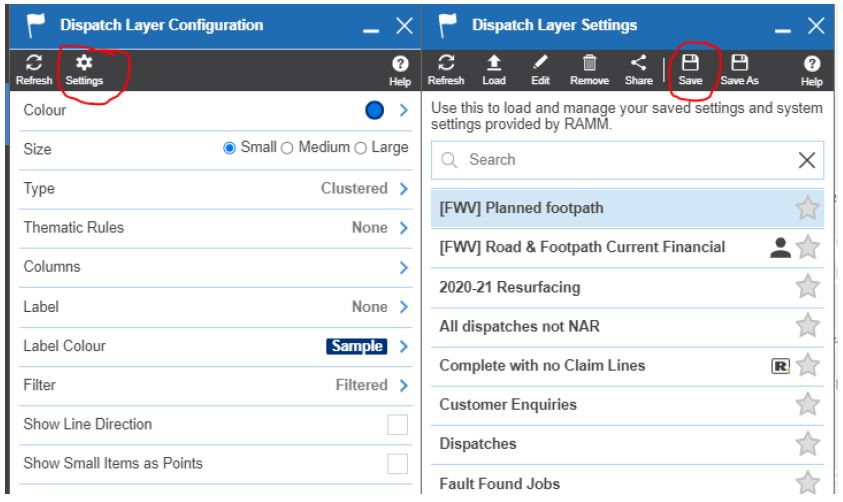 4) Open up the layer menu again, select the export option. Copy the link at the bottom of the export window and send to the NFWV team. You'll also need to let the team know what fields in RAMM relate to the fields in the FWV - the NFWV fields are as follows: - project name - project reference - project description - start date - end date - contact name - contact email - contact phone number If your RAMM tables don't contain that information - don't worry, for most of the fields we can apply information across all projects through the backend, but the project name and reference need to be in RAMM. If you get stuck - contact us at [email protected], or if you're stuck with the RAMM process, please visit the ThinkProject RAMM Help page 
Back to Help Library
Bulk vs Manual upload3/4/2023 The Forward Works Viewer can ingest data in multiple ways:
Method 1 - bulk upload via an API We can usually extract data from any systems of record which has an API available, such as an ESRI REST service or a web feature service. We work with you to determine which tables will be exposed in the FWV and which fields will match up to the fields we require. We can use FME to help us do this. If your system of record doesn't contain geospatial data, you can send shapefiles to us separately which we can match up to the lines in the table. The benefits of this approach mean higher accuracy and confidence in the data, and less work in the long run as only one system of record needs to be kept up to date. Method 2 - bulk upload via data extract (excel) We can also accept data extracts in an excel table with matching shapefiles. Data from your system of record is extracted on an agreed frequency, put into an excel template, and along with shapefiles, sent to [email protected] on a regular basis. We then upload the data and overwrite any previously published projects in the FWV. The benefits of this approach mean only one system of record needs to be kept up to date. Method 3 - manually input into the FWV We recommend this option if you don't have many projects to publish, or only have projects on an adhoc basis. It's very simple to do - simply follow the instructions here. As the project has no links to your source of record, you'll need to keep your published project updated in the FWV (for example if the dates change). What data do we need? We publish a minimum of:
Got questions? Email us at [email protected]
Back to Help Library
Drawing project boundaries31/3/2023 Drawing/Editing project boundaries from a manually created project To draw or edit/delete a project boundary, you need to edit the project. Click on the edit icon on the project summary page (or the stage page if you're editing a stage boundary). If you don't need to edit the project summary, click 'next'. This will take you to the project boundary page. If you're editing a stage boundary, you will be taken immediately to the boundary editing page. 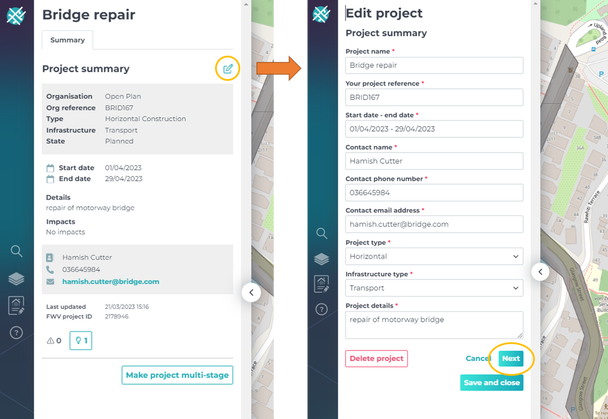 If you need to add an additional shape, click the 'draw polygon' button. If you need to edit or delete, click the corresponding buttons as labelled below. 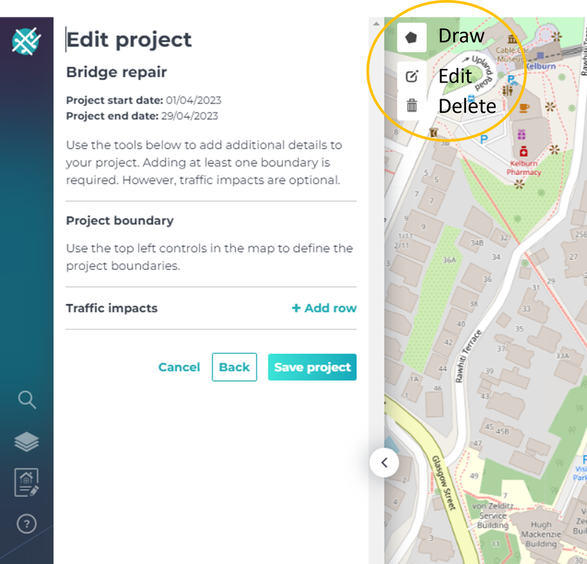 Drawing a project boundary Click the drawing icon. Click on the map where you want to start drawing your project. Using your mouse, click each point along the road/shape you want to draw. To finish drawing, double click, or click 'finish' in the drawing menu box.  Editing a project boundary To edit an existing boundary, click on the edit tool. This will create anchor points (white squares) around each shape that you can edit. Click on an anchor point to move it. Dragging the anchor points will sometimes create additional anchor points either side of the initial anchor point you moved, allowing you to create a more precise shape. Click save in the drawing menu bar to commit the change. Click 'save project' to save all of your changes. 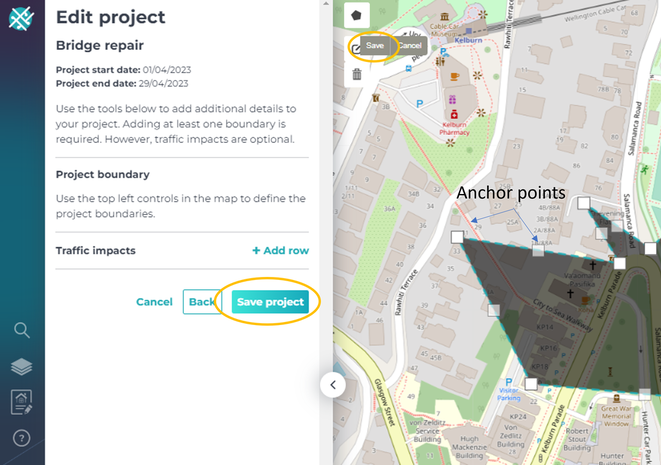 Deleting a project boundary Please note all projects and stages need at least one boundary. If you need to delete a project boundary, click on the trash can in the drawing tool. Then click on the shape you want to delete. This will make the shape disappear. If there are many shapes to delete, you can select 'clear all' from the drawing tools menu. To commit the change, click 'save' in the drawing tool menu. Click 'save project' to save all of your changes. 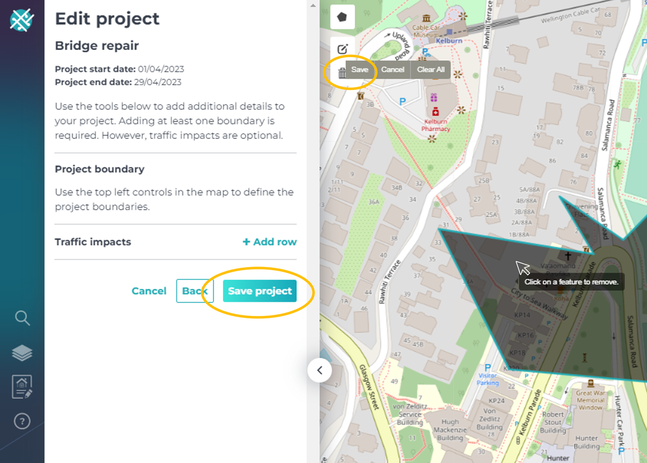 Drawing/editing boundaries from a automated project upload supplied with no shapefile Organisations can supply us with projects that don't have a shape file, and the organisation can then draw the shape on the map within the Forward Works Viewer. For example, if you supply us with an excel spreadsheet of your projects, we can upload this sheet, and you can find your project in the FWV and draw it on the map to get the clash and opportunities. Once your data has been uploaded, find your projects in My Organisation's Projects and select the Filter: 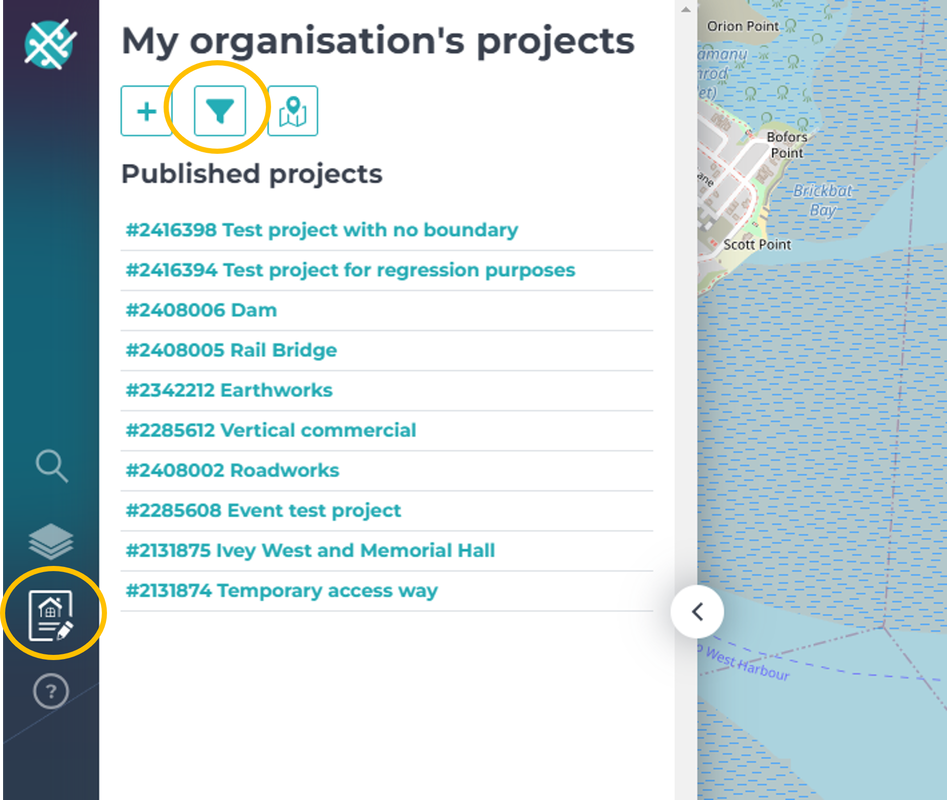 Select 'Projects with No Boundary', apply the filter and this will bring up a list of all projects for your organisation which do not have a boundary supplied.  Click on the project to bring up the project summary page, then select the 'edit' button. TOP TIP - it's helpful to use the Location search in the top right of the map to navigate to where you want to draw your project, before you hit the edit button. 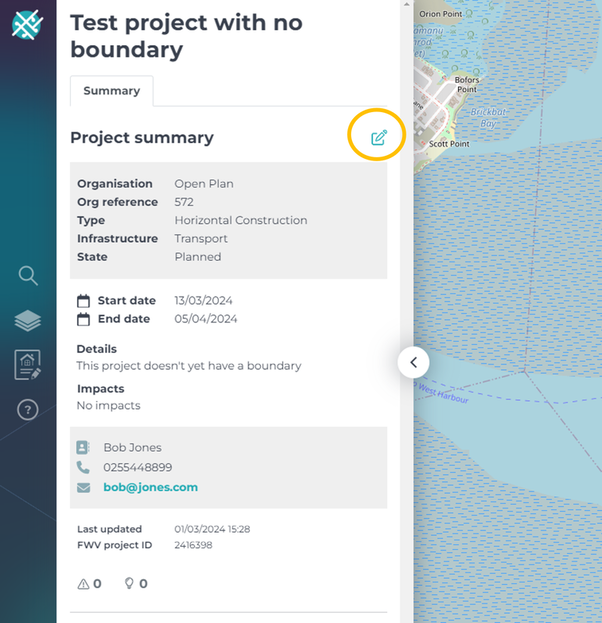 Use the drawing tools to create a project boundary - select the top polygon tool to begin drawing. 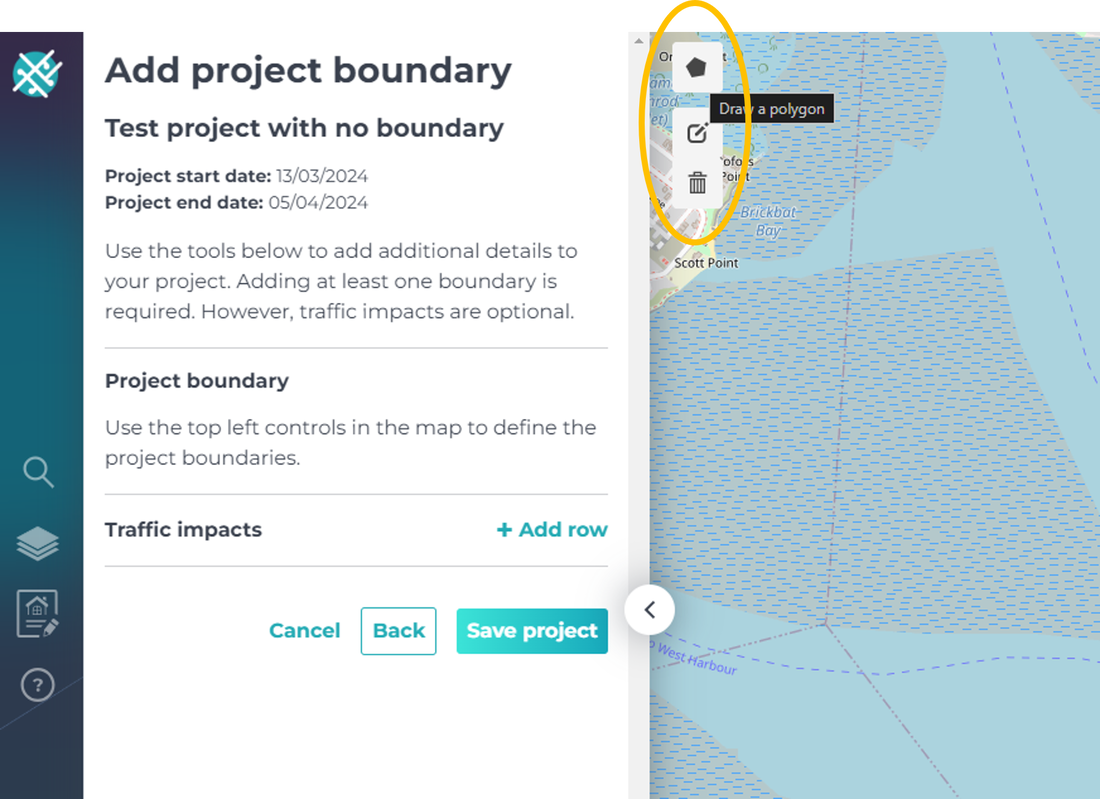 Click on the map to draw a polygon point, and each map click creates another point. These points can be dragged around the map to create intricate shapes. To close the shape, double click on a point, or click 'finish'. 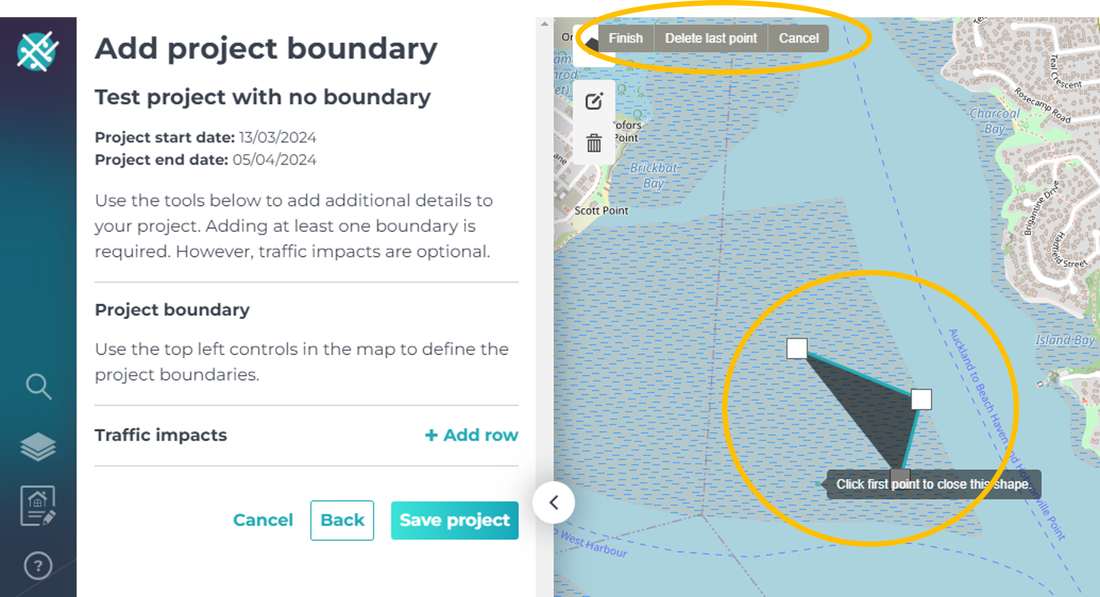 Click 'save project'. Your project shape will appear on the map, and will now generate clashes and opportunities.
Back to Help Library
Navigating the FWV21/10/2022 How do I navigate around the map in FWV?
What to all the buttons on the map mean? 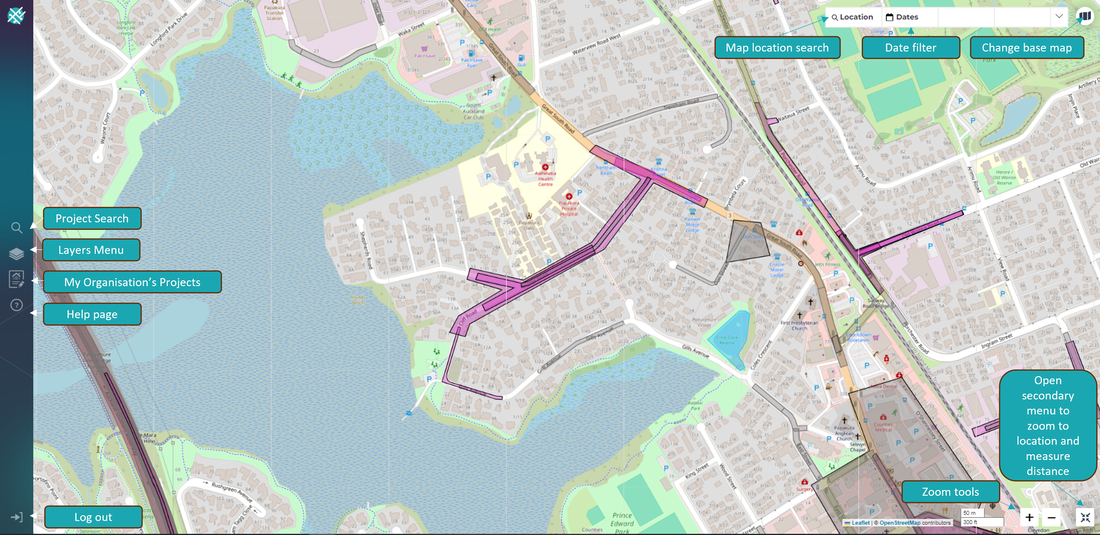 Watch the video below
Back to Help Library
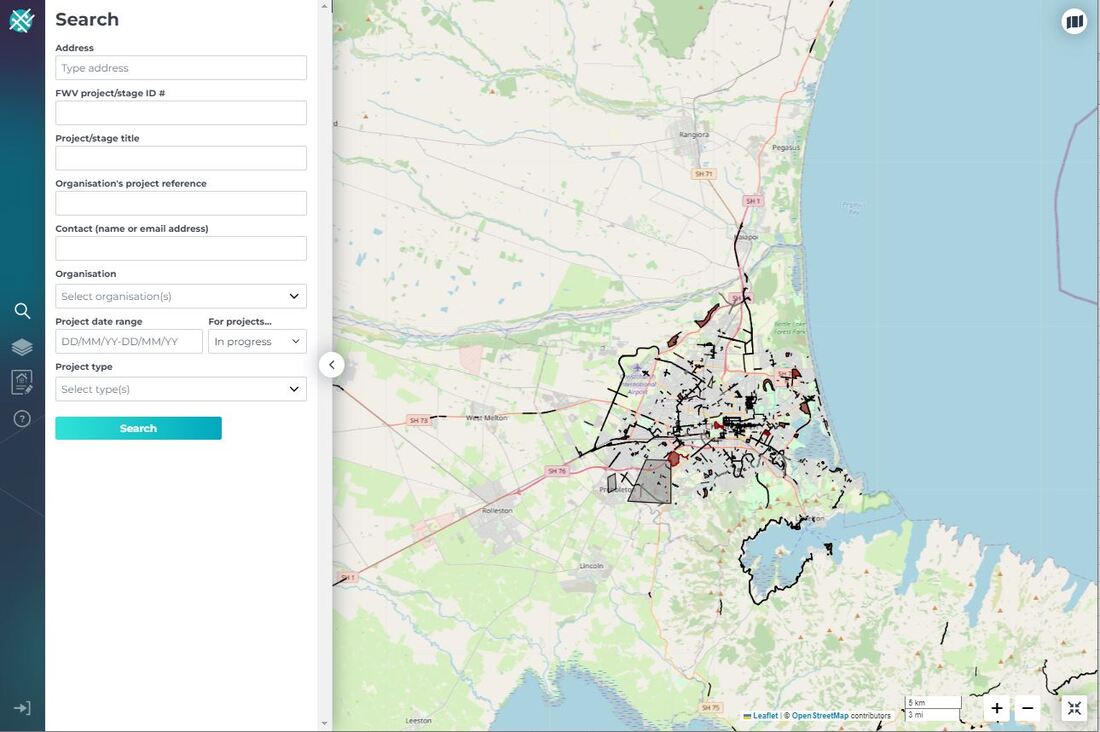
How to search for a project20/10/2022 You can search for projects multiple ways. Search for a project on the map
 Find your project in 'My Organisation's Projects'
 Use the search function in the sidebar menu
Back to Help Library
How to add a project20/10/2022 Adding the project details If you'd rather watch a video, scroll further down
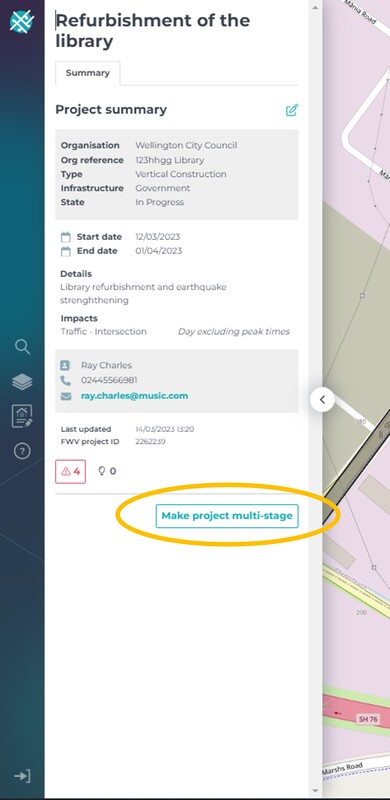
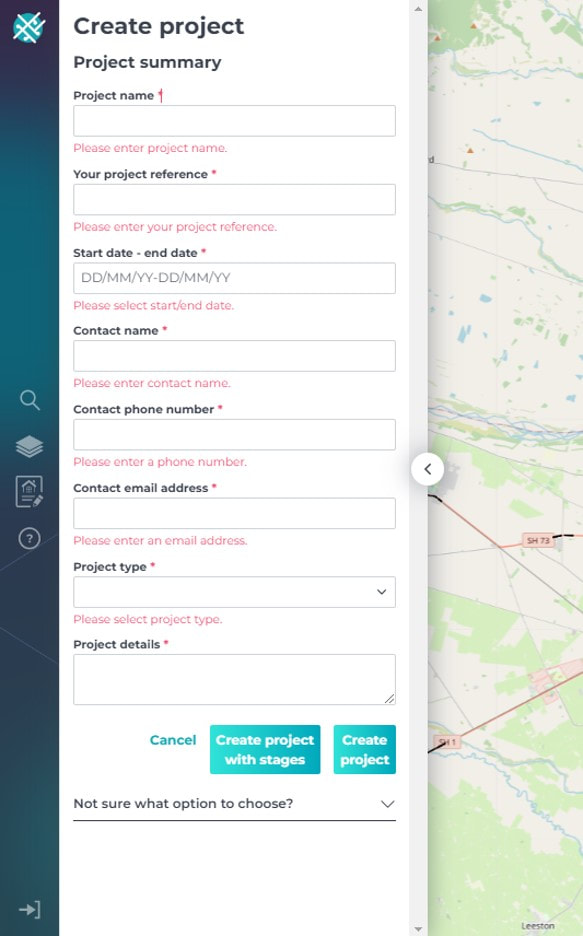 Create project with stages
 Create project (with no stages)
Watch the video below See also....
Back to Help Library
Edit/delete my projects19/10/2022 If you'd rather watch a video, scroll to the bottom of this page. Important: please only edit/delete your project if you have entered it manually through the FWV platform. If your project has been published via an automatic feed, any edits or deletions you make in the FWV will be overwritten by the automatic feed. Please contact [email protected] if you're unsure.
 Watch the video here See also...
Back to Help Library
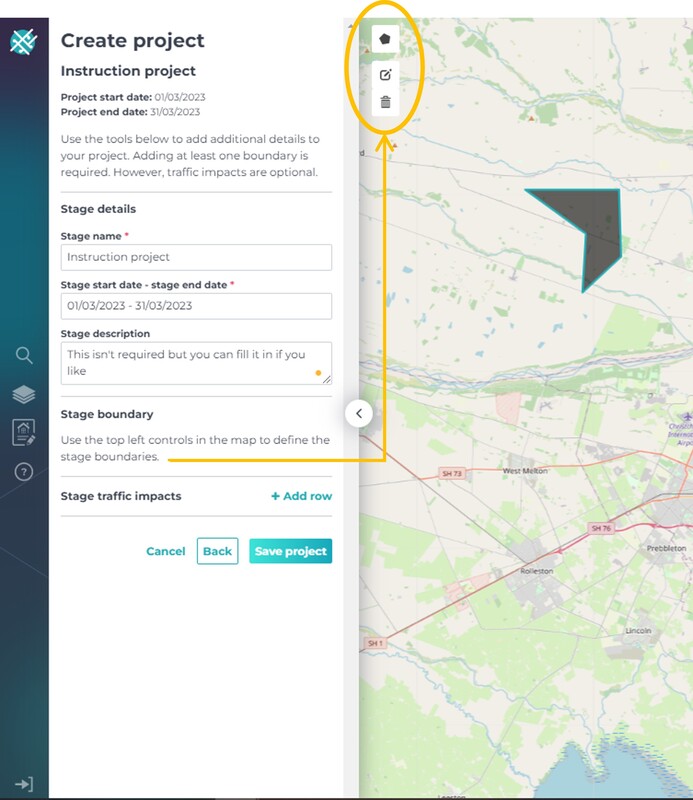
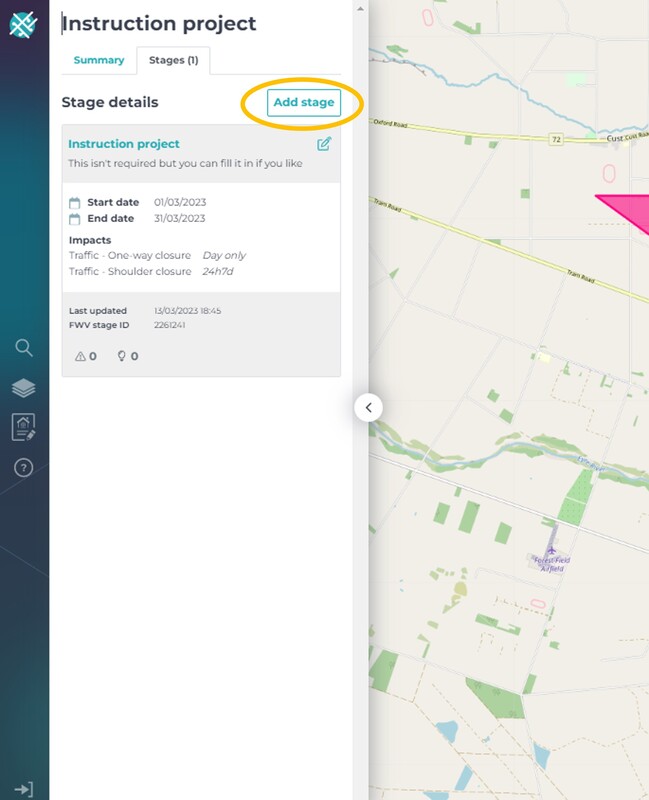
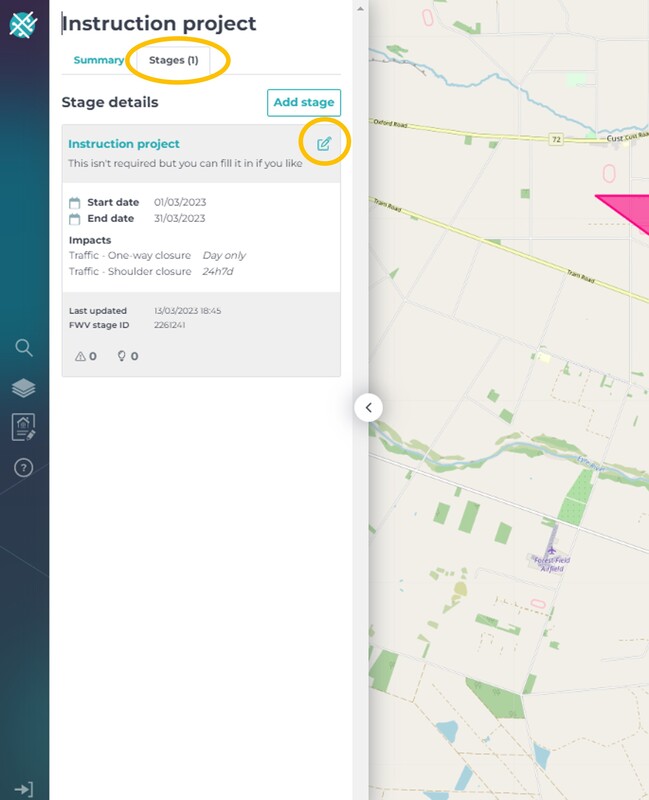
Adding additional stages18/10/2022 If you'd rather watch a video, scroll further down If you selected 'create project' when you entered your project into the FWV, and now want to add additional stages, you can do so.
Watch the video below
Back to Help Library
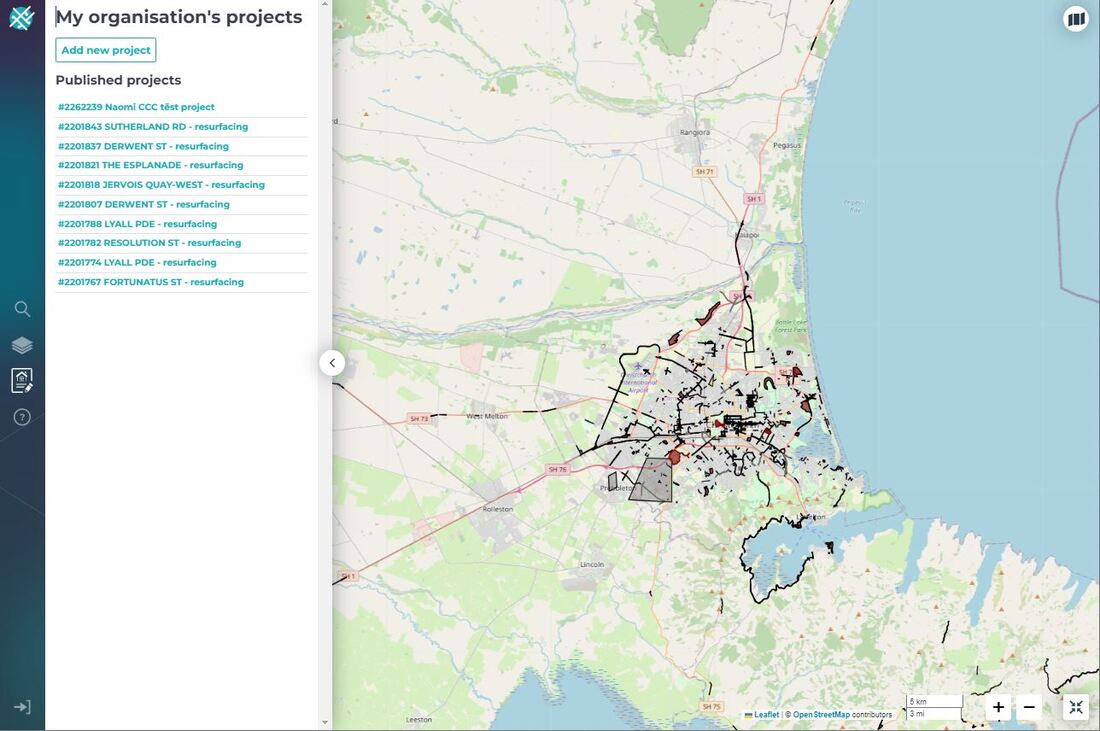
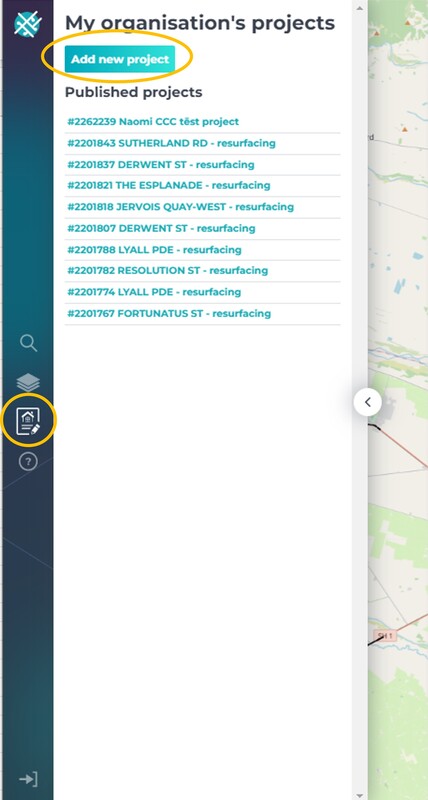
How to access my projects17/10/2022 To find your projects, click on 'My Organisation's Projects' icon. This will bring up a list of up to 50 of your organisation's projects, ordered by those that are in the future and have a start date closest to today's date. Note 1: we will be introducing additional functionality to this tab in the future, including the ability to show the projects on the map, and a filter function to sort your projects.  You can also use the 'search' function in the sidebar menu to find your projects. You can search for projects using a variety of filters including organisation, contact name, project reference, time frame and type. The more filters you apply, the better your search results will be. 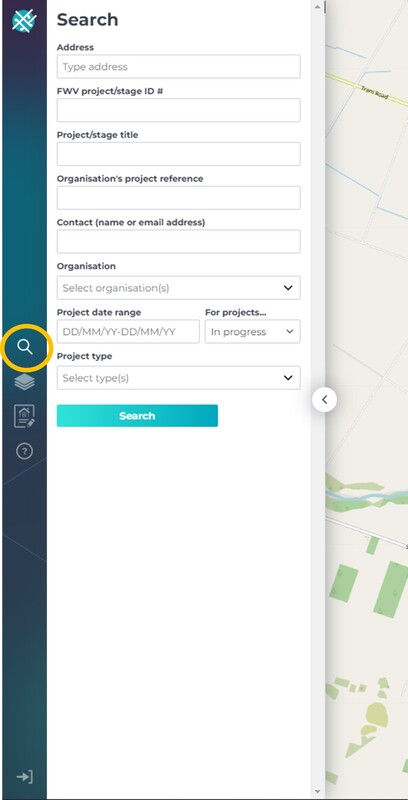 See also...
Back to Help Library
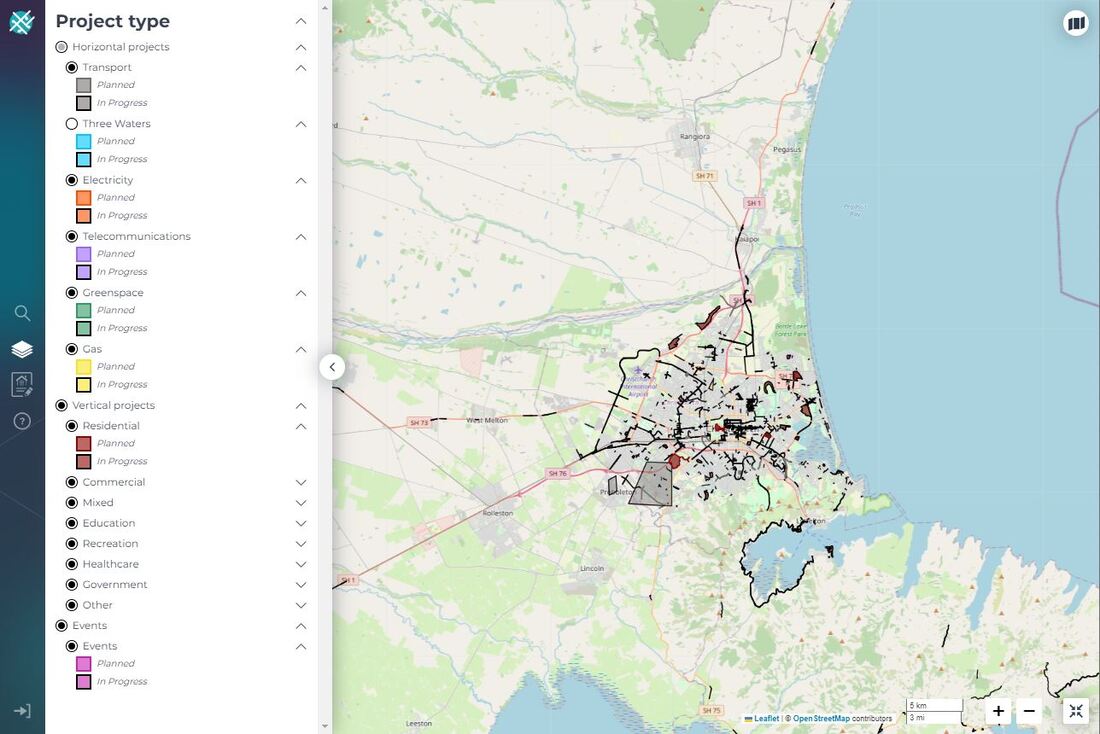
Infrastructure Layers30/9/2022 How do I turn on different infrastructure layers?
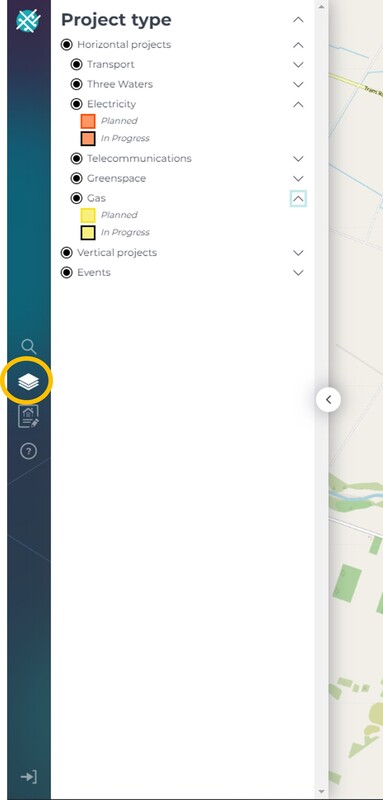 Watch the video below
Back to Help Library
Contextual Layers30/9/2022 What is a contextual layer? A contextual layer is any information which is not a project but provides context to the area surrounding it - for example it could be a bus route, haulage routes, notable trees, sites of significance to Māori, planning consents etc. If there's a layer you'd like to see, please contact us. There is a charge to upload a contextual layer. How do I turn on a contextual layer?
How do I add a contextual layer? Contextual layers are currently added by the helpdesk and there is a charge to do this. If there is a geospatial layer you'd like to see in the FWV please contact us. 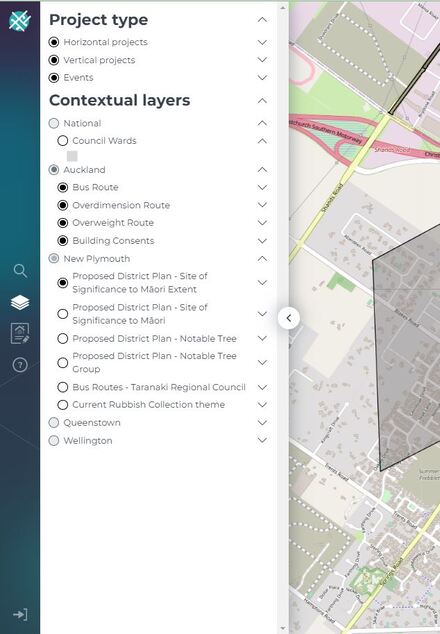 Watch the video below
Back to Help Library
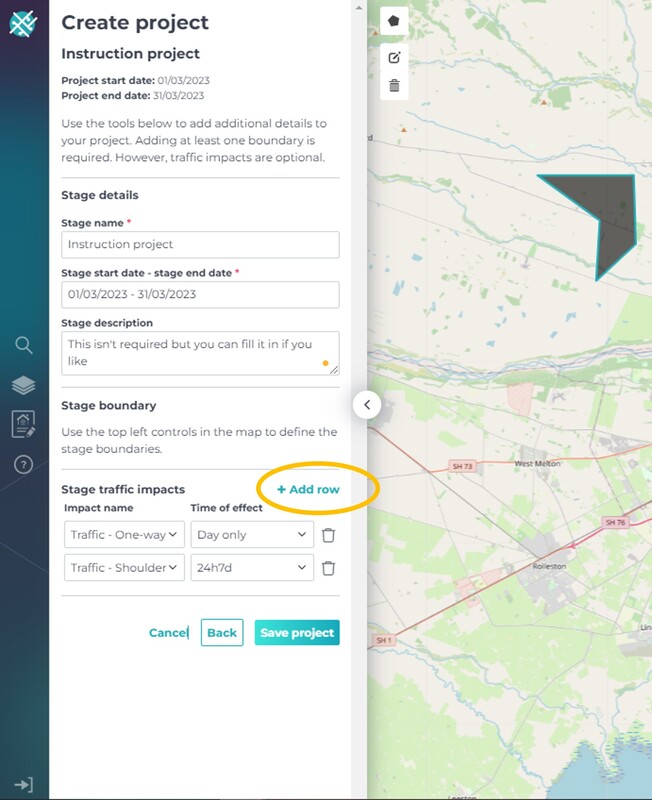
Adding traffic impacts29/9/2022 How do I add traffic impacts? Traffic impacts of a project can be added when you create your project, or can be added afterwards by editing your project. The traffic impact will be linked to the boundary of the project. In the future we will be introducing a traffic impact layer, so that you can see traffic impacts on the map. Watch the video below See also....
Back to Help Library
Changing basemap style27/9/2022 How do I change the basemap in the FWV? Click on the top right map icon. You can switch between an Open Street Map base, or LINZ world imagery. 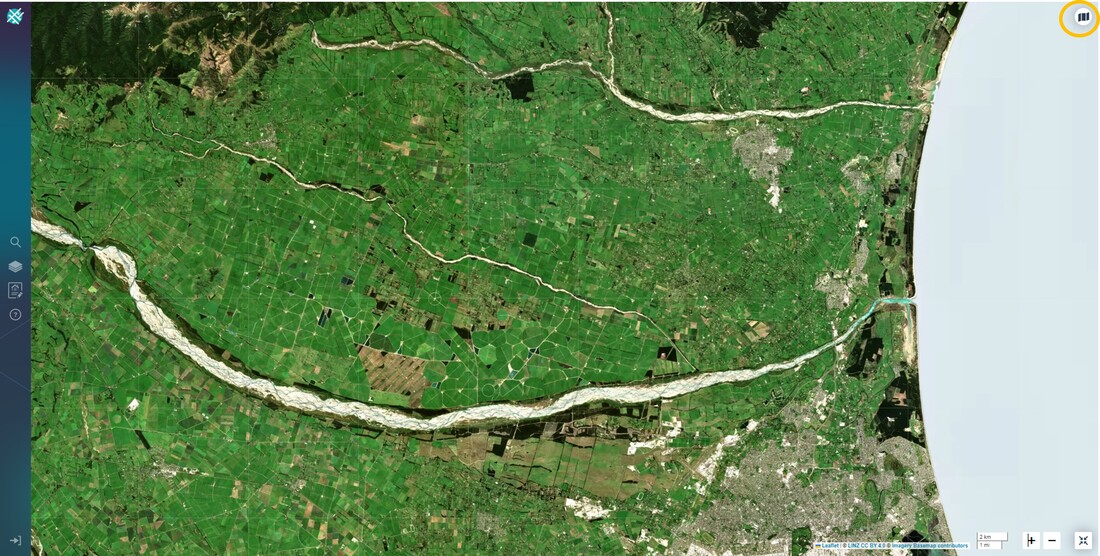 Watch the video below
Back to Help Library
How do I reset my password?26/9/2022 If you can't remember your login, or want to reset your password for any reason, click 'forgot password?' link on the homepage. 
Back to Help Library
I've moved organisations25/9/2022 I have moved to a different organisation and want to keep my FWV account.
That's OK! Please email [email protected] to let us know which organisation you'd like to be associated with and we can adjust it at our end. If you've got project planner access, you'll only be able to edit projects for the organisation your account is linked to. |

|
E: [email protected] A: SaltWorks, 4 Ash Street, Christchurch P: 0210 493 219
|
© COPYRIGHT 2021. ALL RIGHTS RESERVED.
|
|
|

|
|

|

|